Planting Potholders

I planted these potholders

and a flower grew.

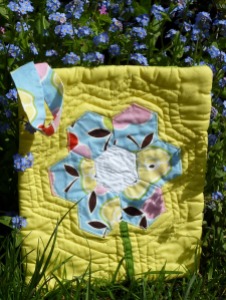
I went to the Portland Modern Quilt Guild (PMQG) meeting last night.  I made two potholders for the potholder exchange and I got this one back.  It was made by Jen Bailly.  The blue in the flower is so similar to the YOLO Colorhouse DREAM.01 color of our kitchen and dining room that I could swear she came over and peeked.  It was really amazing to watch how so many people picked from a collection of brown paper bags and wound up with a potholder that had a swatch of their favorite fabric or color.  I guess sometimes we really do get what we want….Thank you, Jen.

I guess what I have also be wanting is to learn new quilting skills from a group of very accomplished quilters.  I felt like an amateur surrounded by experts.  There had been a hot pad tutorial link from Sew, Mama, Sew! on the PMQG blog post announcing the potholder swap.  This was my first attempt at a potholder (except for the ones I made on a potholder loom as a child, which are actually the same ones I still use since my grandmother and great aunt have both passed and the potholders have come full circle).

My first attempt at a quilt was during a doll quilt class at Bolt about a year ago.  I got sick between the two weeks of class and was not able to do my “homework” between the classes.  I was still piecing on the second night of class and didn’t get to quilt or bind my quilt in class.  I am a very kinesthetic learner and I really need to “do” something to really “learn” it.  I made an attempt to stitch in the ditch, per the instructions, but I was so dissatisfied with the way it looked on the quilt top that I terminated the entire project.  I never got around to attempting the binding.

Now I have started my new t-shirt project (yes, I will post about this soon), which strategically requires no binding.  But, I knew that a binding (actually two) would be in my future with the potholders.  I started with the tutorial and cut 2.5” wide strips of five different fabrics.  Since I am so sleep deprived I didn’t want to have to make multiple decisions about piecing.  So, I took the brown bag trick I learned at the Denyse Schmidt workshop I took last summer at PNCA and tweaked it a little.  I put all of my strips in a pile.

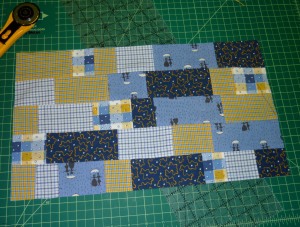
Then I cut up four small chunks of paper and put a 2, a 3, a 4 and a 5 on each piece.  I closed my eyes and picked out a piece of fabric and a piece of paper.  I cut the 2.5” wide strips to the length written on the piece of paper.  The only modification I made was that I kept the just cut piece of fabric on my mat when I selected the next piece so that I didn’t have two of the same colors side by side.

I stitched them together for the top (I used ¼” seams instead of ½” in the tutorial).

My sandwich consisted of the top, a layer of batting, a layer and Insul-Bright (thank you to The Warm Company for their generous donation to the PMQG meeting) and my backing.  I used the 1/8” allowance recommended in the tutorial.  I did have a little shifting in the quilting process.  I squared up my edges when I was done.  I had already squared up my edges before quilting the top so I will probably only tip the edges after quilting next time.  I bravely sliced the whole thing in two.  Then I could avoid the binding no longer.

I reviewed multiple sources on how to attach a binding and was still confused.  So, I just started sewing.  Then it did make sense.  I got to my first corner and stitched and folded and stitched again…..and it worked.  Wow.  I complete all four corners and stopped.  Then the trouble began.  It is one thing to mess up with stitching, but it is completely another when a rotary cutter is involved.  I misunderstood the part about lining up my edges and trimming and I trimmed too much and at the wrong angle.  Wow.  That was a big mistake.

Luckily I had a second potholder.  I was so confident about attaching the binding and stitching the corners that the second one was a breeze.  I correctly attached the two tails, and even though it was not quite as precise as I would prefer, it was Thursday afternoon and I had to leave to take Henrik to music.  I made a feeble attempt to add fabric back onto the tails of the first binding, and then, uttered a few choice words, and ripped the whole thing out and started fresh.  I grabbed the potholders, thread, scissors, a needle and Henrik and ran out the door.

I hand stitched the binding on the backside of one potholder while Henrik was in his class.  I stitched the second as soon as we got home.  I finished at 6pm and raced outside to take pictures.  I was in such a hurry that I now realized that the left potholder should have been rotated 180 degrees to match up with the original whole piece.  Anyway, Rob graciously made salads and tuna fish sandwiches and I raced off to PNCA.

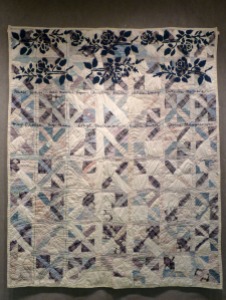
I hope that my binding experience will encourage others to jump right in even if you are confused by the written instructions!  Remember, stitching errors can be fixed!  Rotary cutters are less forgiving!  The next PMQG meeting will be May 20th.  Check out the website if you are interested.  Also, Natalie Chanin’s beautiful quilts (historic quilts that have been stabilized and embroidered upon by her stitchers) are still up in the Pearl Room at Powell’s.  I was told that they will be up through the end of the month.  I have seen them three times now.  They are exquisite!

Leave a Reply

Planting Potholders

I planted these potholders

and a flower grew.

I went to the Portland Modern Quilt Guild (PMQG) meeting last night.  I made two potholders for the potholder exchange and I got this one back.  It was made by Jen Bailly.  The blue in the flower is so similar to the YOLO Colorhouse DREAM.01 color of our kitchen and dining room that I could swear she came over and peeked.  It was really amazing to watch how so many people picked from a collection of brown paper bags and wound up with a potholder that had a swatch of their favorite fabric or color.  I guess sometimes we really do get what we want….Thank you, Jen.

I guess what I have also be wanting is to learn new quilting skills from a group of very accomplished quilters.  I felt like an amateur surrounded by experts.  There had been a hot pad tutorial link from Sew, Mama, Sew! on the PMQG blog post announcing the potholder swap.  This was my first attempt at a potholder (except for the ones I made on a potholder loom as a child, which are actually the same ones I still use since my grandmother and great aunt have both passed and the potholders have come full circle).

My first attempt at a quilt was during a doll quilt class at Bolt about a year ago.  I got sick between the two weeks of class and was not able to do my “homework” between the classes.  I was still piecing on the second night of class and didn’t get to quilt or bind my quilt in class.  I am a very kinesthetic learner and I really need to “do” something to really “learn” it.  I made an attempt to stitch in the ditch, per the instructions, but I was so dissatisfied with the way it looked on the quilt top that I terminated the entire project.  I never got around to attempting the binding.

Now I have started my new t-shirt project (yes, I will post about this soon), which strategically requires no binding.  But, I knew that a binding (actually two) would be in my future with the potholders.  I started with the tutorial and cut 2.5” wide strips of five different fabrics.  Since I am so sleep deprived I didn’t want to have to make multiple decisions about piecing.  So, I took the brown bag trick I learned at the Denyse Schmidt workshop I took last summer at PNCA and tweaked it a little.  I put all of my strips in a pile.

Then I cut up four small chunks of paper and put a 2, a 3, a 4 and a 5 on each piece.  I closed my eyes and picked out a piece of fabric and a piece of paper.  I cut the 2.5” wide strips to the length written on the piece of paper.  The only modification I made was that I kept the just cut piece of fabric on my mat when I selected the next piece so that I didn’t have two of the same colors side by side.

I stitched them together for the top (I used ¼” seams instead of ½” in the tutorial).

My sandwich consisted of the top, a layer of batting, a layer and Insul-Bright (thank you to The Warm Company for their generous donation to the PMQG meeting) and my backing.  I used the 1/8” allowance recommended in the tutorial.  I did have a little shifting in the quilting process.  I squared up my edges when I was done.  I had already squared up my edges before quilting the top so I will probably only tip the edges after quilting next time.  I bravely sliced the whole thing in two.  Then I could avoid the binding no longer.

I reviewed multiple sources on how to attach a binding and was still confused.  So, I just started sewing.  Then it did make sense.  I got to my first corner and stitched and folded and stitched again…..and it worked.  Wow.  I complete all four corners and stopped.  Then the trouble began.  It is one thing to mess up with stitching, but it is completely another when a rotary cutter is involved.  I misunderstood the part about lining up my edges and trimming and I trimmed too much and at the wrong angle.  Wow.  That was a big mistake.

Luckily I had a second potholder.  I was so confident about attaching the binding and stitching the corners that the second one was a breeze.  I correctly attached the two tails, and even though it was not quite as precise as I would prefer, it was Thursday afternoon and I had to leave to take Henrik to music.  I made a feeble attempt to add fabric back onto the tails of the first binding, and then, uttered a few choice words, and ripped the whole thing out and started fresh.  I grabbed the potholders, thread, scissors, a needle and Henrik and ran out the door.

I hand stitched the binding on the backside of one potholder while Henrik was in his class.  I stitched the second as soon as we got home.  I finished at 6pm and raced outside to take pictures.  I was in such a hurry that I now realized that the left potholder should have been rotated 180 degrees to match up with the original whole piece.  Anyway, Rob graciously made salads and tuna fish sandwiches and I raced off to PNCA.

I hope that my binding experience will encourage others to jump right in even if you are confused by the written instructions!  Remember, stitching errors can be fixed!  Rotary cutters are less forgiving!  The next PMQG meeting will be May 20th.  Check out the website if you are interested.  Also, Natalie Chanin’s beautiful quilts (historic quilts that have been stabilized and embroidered upon by her stitchers) are still up in the Pearl Room at Powell’s.  I was told that they will be up through the end of the month.  I have seen them three times now.  They are exquisite!

Leave a Reply